Memorial Day weekend 2026 is right around the corner, and across America, homeowners are tackling that one outdoor lighting upgrade they’ve been putting off all winter: replacing tired, dated porch lights with a modern statement fixture. If you’re planning to install a 15.75″ up-down LED wall sconce this spring, there’s one detail that trips up most DIYers — the exterior wall surface itself. A vinyl-sided ranch in Ohio, a stucco bungalow in Arizona, and a brick colonial in Virginia each call for a slightly different installation approach.
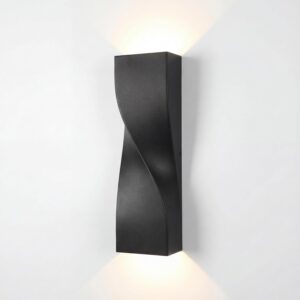
This step-by-step installation guide walks you through mounting a large 20W LED outdoor wall sconce on the three most common American exterior surfaces — vinyl siding, stucco, and brick — so your finished install looks clean, sits flush, and stays waterproof for years. We’ll be using the PLUSLED Large 15.75″ Modern Outdoor Wall Sconce (matte black S-shape, IP65-rated, hardwired) as our reference fixture throughout, but the techniques apply to any similarly sized up-down LED porch light.
Before You Start: Tools, Time & Safety
Plan on 90 to 120 minutes for a single-fixture replacement, plus another 30 minutes if you’re going from scratch on a wall with no existing junction box. Memorial Day weekend is ideal because daylight runs past 8 PM in most of the US, giving you plenty of time to wrap up before sunset.
Tools you’ll need
- Cordless drill with 1/4″ and 3/8″ bits (plus a masonry bit for brick or stucco)
- Voltage tester (non-contact pen-style works great)
- Phillips and flathead screwdrivers
- Wire stripper / cutter
- Wire nuts (typically supplied with the fixture)
- Outdoor-rated silicone caulk
- Level (a small torpedo level is perfect)
- Painter’s tape and a pencil
- Step ladder rated for your weight
Safety first — every single time
Kill the power at the breaker, then verify with a voltage tester at the existing fixture wires before you touch anything. The PLUSLED 15.75″ sconce is a hardwired 120V fixture (it is not solar), so this step is non-negotiable. Tape a “DO NOT TURN ON” note over the breaker so a curious family member doesn’t flip it back while you’re up the ladder.
Step 1: Remove the Old Fixture & Inspect the Junction Box
With the breaker off, remove the existing porch light by unscrewing the mounting cap nuts or bracket screws. Carefully pull the fixture away from the wall and untwist the wire nuts holding the black (hot), white (neutral), and bare copper (ground) wires.
Now inspect the junction box. American homes built before 2000 sometimes have outdoor boxes that have rusted, cracked, or pulled loose from the framing. If yours is damaged, replace it with a new weatherproof PVC or metal box rated for exterior wet locations before mounting the new sconce. Skipping this step is the #1 reason DIY outdoor lighting installs fail an inspection.
Step 2: Choose the Right Mounting Strategy for Your Wall
The 15.75″ PLUSLED sconce is taller and heavier than a standard 10-inch porch light (it’s a true statement piece), which means the mounting plate has to land flat against the wall surface — no rocking, no gaps. Here’s how to handle each of the big three American exterior surfaces.
Option A — Vinyl siding
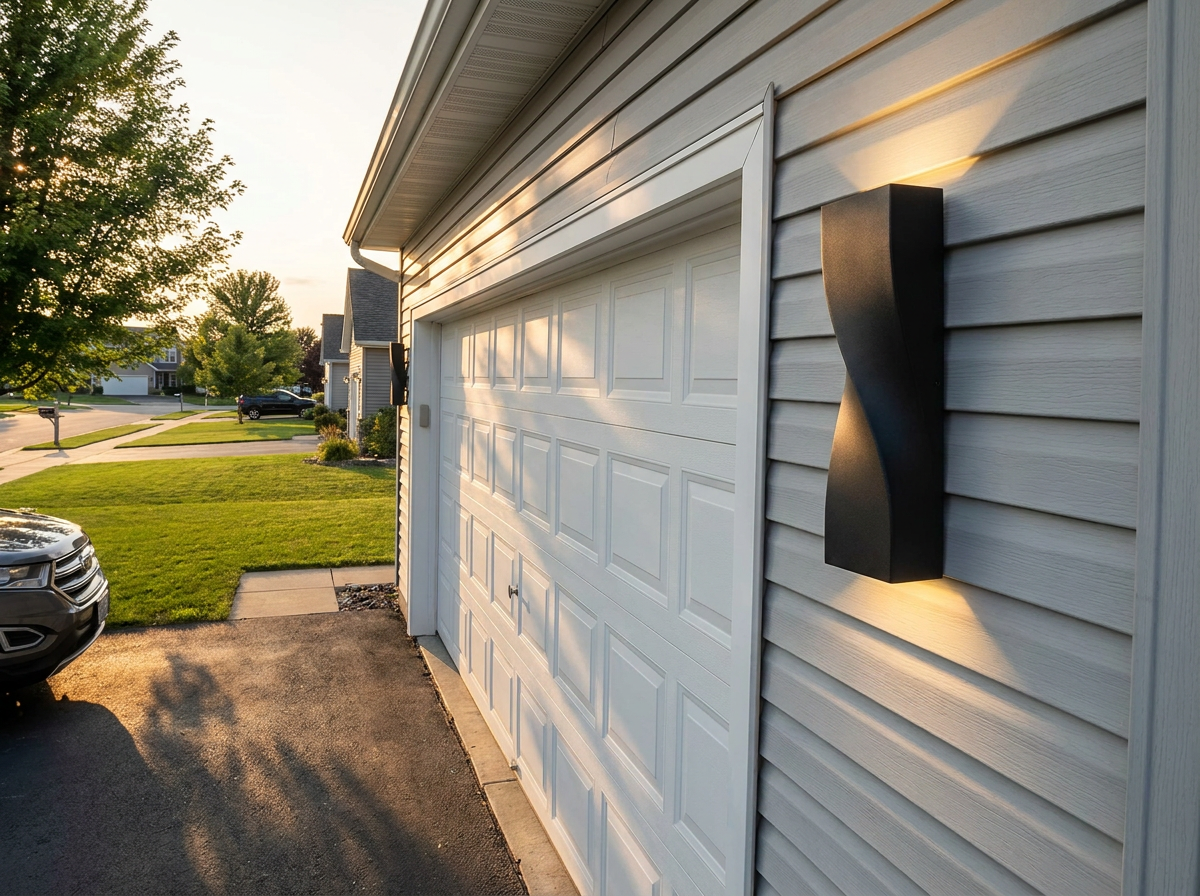
Vinyl siding is the most common American exterior, and also the easiest surface to get wrong. The siding panels are not flat — they have a stepped profile — so mounting the sconce directly to the siding can create gaps that let in water and bugs. The fix: use a vinyl mounting block (sometimes called a “siding block” or “lamp mount block”). These are $8–$15 at any home center, come pre-cut to slide between siding courses, and give you a flat, weatherproof mounting surface. Install the block first, then mount the PLUSLED bracket directly to it.
Option B — Stucco
For stucco walls, common in the Sun Belt and Southwest, you’ll need a masonry bit and plastic wall anchors rated for stucco/concrete. Drill the pilot holes slowly to avoid cracking the stucco surface, vacuum out the dust, then tap in the anchors flush with the wall. Apply a small bead of outdoor silicone caulk around each anchor before driving the mounting screws — this keeps water from migrating behind the stucco coat.
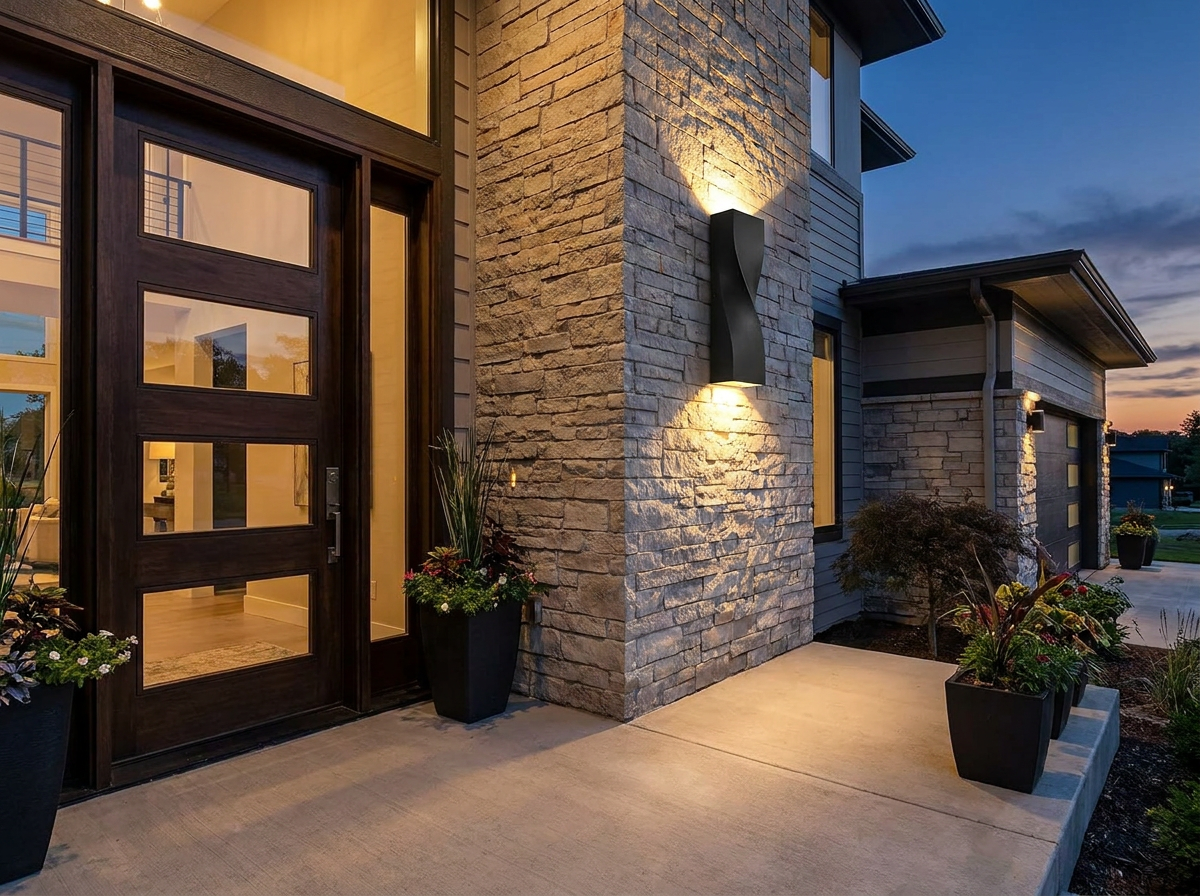
Option C — Brick
On brick exteriors, always drill into the mortar joints, not the brick face. Mortar is softer, easier to repair if you ever remove the fixture, and far less likely to spider-crack. Use a 1/4″ masonry bit and brick-rated tapcon screws or sleeve anchors. Because the PLUSLED 15.75″ mounting plate is vertical, you can usually align both screw holes with two adjacent mortar joints if you plan the layout carefully.
Step 3: Wire the Fixture (10 Minutes)
With the mounting bracket secured to the wall (or block), feed the supply wires through the bracket’s center hole and connect them to the matching fixture leads:
- Black to black (hot to hot)
- White to white (neutral to neutral)
- Green or bare copper to the ground screw (or to the fixture’s ground lead)
Twist each pair of stripped wire ends together clockwise, then cap with a wire nut. Tug each connection lightly to make sure nothing slips out. Tuck the wires neatly into the junction box — don’t leave them bunched up against the back of the fixture, where they can interfere with the IP65 gasket seating properly.
Step 4: Mount the Sconce & Seal the Edges
Lift the 15.75″ fixture up to the bracket — this is a two-person job for safety, since the sconce is taller than most you’ve handled before. Align the keyhole slots on the back plate with the bracket studs and tighten the cap nuts evenly. Use your torpedo level to confirm the fixture is plumb (a vertical S-shape sconce shows even a 2-degree tilt very clearly).
Once the fixture is plumb and snug, run a thin bead of outdoor silicone caulk along the top and both side edges of the back plate, leaving the bottom edge open so any moisture that does sneak in can drain out. This is the same trick electricians use on coastal and humid-climate installs, and it’s what keeps your IP65 rating intact in real-world spring rain.
Step 5: Power Up & Test the Up-Down Beams
Head back to the breaker, flip it on, and walk back to the fixture. The PLUSLED 15.75″ sconce throws a focused 20W LED beam upward and another downward, painting the wall with two soft cones of warm light. Confirm both beams light up and the fixture stays cool to the touch after a few minutes (LEDs run dramatically cooler than the old halogen porch lights they’re replacing).
If only one direction lights up, the fixture has shifted slightly during mounting — loosen the cap nuts, re-seat, and re-tighten. If neither lights up, kill the breaker again and re-check your wire-nut connections.
Pro Tips From American Installers
- Match the height to the front door. The standard rule is to mount the center of an outdoor wall sconce 66″ to 72″ off the porch floor. Because the PLUSLED is 15.75″ tall, that puts the top of the fixture roughly at door-handle height plus 10″ — perfect for the up-beam to wash the porch ceiling.
- Pair them in twos. If you’re installing flanking sconces beside a garage or double front door, install the second one first using a laser level reference from the first. Asymmetric mounting is the most common eyesore in DIY outdoor lighting.
- Touch up paint after install. Mark the bracket outline with painter’s tape during dry-fit, peel it off after caulking, and you’ll have crisp paint lines instead of a smudged border around your new fixture.
- Save the box. Keep the original packaging for at least 90 days — the IP65 gasket can occasionally need re-seating in extreme temperature swings, and PLUSLED’s warranty service is much faster when you can ship the fixture back in its original box.
Why the 15.75″ S-Shape Is Worth the Extra Install Time
Standard 10-inch porch sconces look proportionally small on most modern American homes, especially newer builds with 9-foot ceilings and oversized front doors. The 15.75″ vertical S-shape solves that scale mismatch in a single fixture — it gives the front facade an architectural anchor, throws meaningful up-and-down light onto the wall, and reads as intentional design rather than a builder-grade afterthought.
For Memorial Day weekend 2026, that one upgrade — done correctly with the right wall-specific approach above — is the single highest-impact curb appeal change most American homeowners can make in under two hours.
Ready to Install Yours This Memorial Day?
The PLUSLED Large 15.75″ Modern Outdoor Wall Sconce is in stock and shipping in time for Memorial Day weekend. It’s IP65 waterproof, hardwired 20W LED, matte black, and ready to transform your front door, garage, or house wall in a single afternoon. Shop the PLUSLED 15.75″ S-shape outdoor wall sconce today and check it off your spring 2026 home improvement list before the holiday weekend.