Mother’s Day Ready: How to Install PLUSLED Outdoor Up-Down Wall Sconces on Your Porch in One Afternoon
Spring is finally here, and with Mother’s Day right around the corner, there’s no better time to give your home’s exterior a fresh, polished look. One of the simplest yet most impactful upgrades you can make? Installing a pair of modern outdoor wall sconces on your front porch or patio. This weekend DIY project takes just a few hours — and the results will transform your home’s curb appeal every single night.
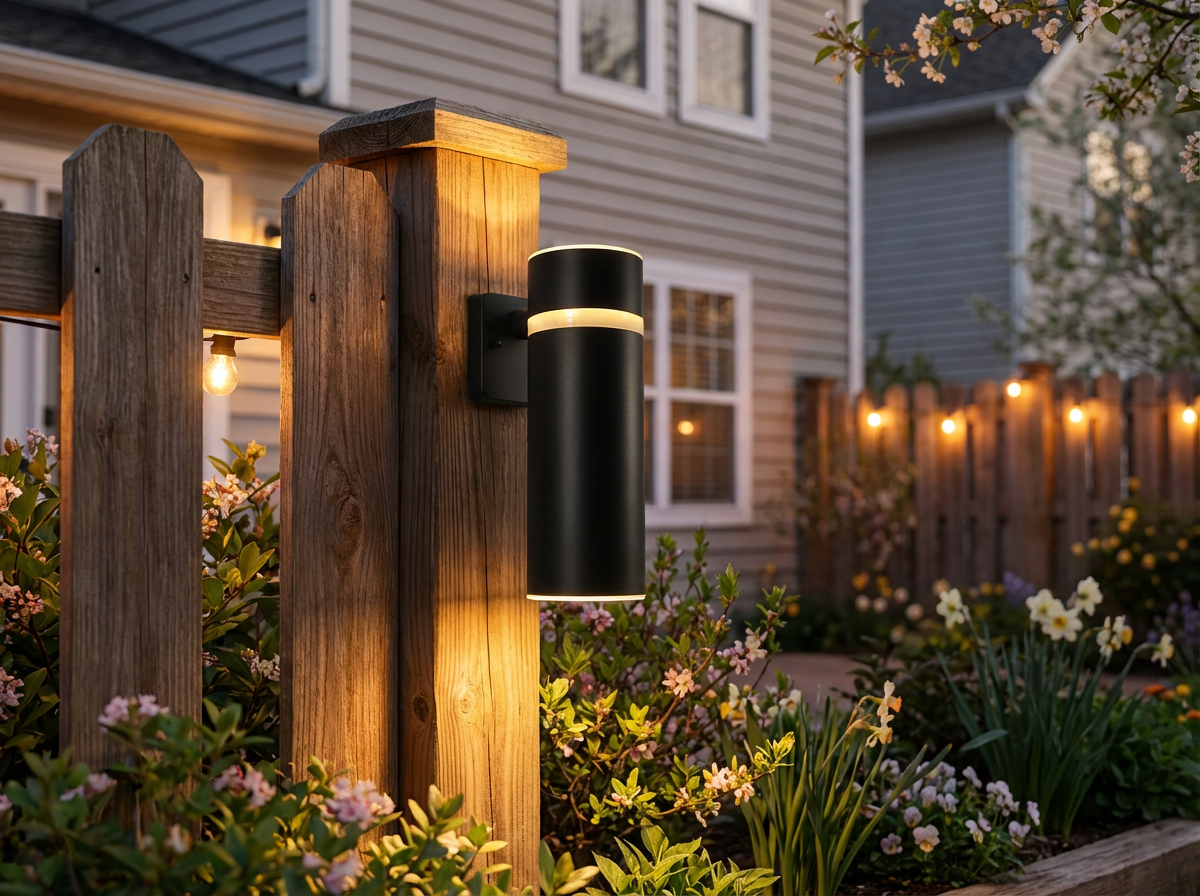
In this step-by-step guide, we’ll walk you through exactly how to install the PLUSLED Outdoor Porch Lights Up and Down Modern E26 Wall Sconces — a matte black aluminum cylinder fixture designed to cast a beautiful dual-direction glow on your front door, fence, patio, or entryway. Whether you’re a seasoned DIYer or tackling your first electrical project, this guide has you covered.

Why Up-Down Wall Sconces Are the Spring 2026 Porch Upgrade Everyone’s Talking About
Unlike traditional single-direction porch lights, up-down wall sconces project light in two directions simultaneously — upward to highlight architectural details and downward to illuminate walkways and entry steps. This dual beam creates a dramatic, layered look that looks right at home in modern American neighborhoods.
The PLUSLED matte black wall sconce is rated IP65 waterproof, built from premium die-cast aluminum, and designed to withstand spring rain, summer heat, and beyond. It uses a standard E26 bulb base, so you can choose your preferred light temperature — from warm 2700K to crisp daylight 5000K.
- IP65 Waterproof — fully protected against rain and dust
- Die-cast aluminum body — rust-proof and built to last outdoors
- Standard E26 base — works with any LED bulb you already own
- Up-down dual beam — architectural lighting effect that looks designer
- Matte black finish — complements modern, farmhouse, and contemporary exteriors
What You’ll Need Before You Start
Before installing your PLUSLED outdoor up-down wall sconce, gather these tools and materials. Most are standard items you likely already have in your garage:
- Flathead and Phillips-head screwdrivers
- Wire stripper / wire cutter
- Voltage tester (non-contact type recommended)
- Drill with masonry or wood bits (depending on your wall type)
- Electrical tape and wire nuts (usually included with the fixture)
- Ladder (if mounting higher than 7 feet)
- Weatherproof silicone caulk (optional but recommended for sealing)
- Your PLUSLED wall sconce kit (includes mounting bracket, screws, and hardware)
Safety first: Always turn off the circuit breaker to the outdoor outlet or light circuit before touching any wiring. Use a non-contact voltage tester to confirm the power is off before you begin.
Step-by-Step Installation Guide
Step 1: Choose Your Mounting Location
The ideal placement for a porch wall sconce is 6 to 7 feet above the ground on either side of your front door, garage door, or along a fence or patio wall. This height puts the light at eye level or just above, so the up-and-down beam effect is visible and functional.
Tip: If you’re mounting two sconces flanking a front door, aim for equal spacing from the door frame — typically 12 to 18 inches on each side. Mark your mounting location with a pencil.
Step 2: Turn Off the Power
Head to your electrical panel and turn off the breaker controlling the outdoor light circuit. If you’re not sure which one it is, flip the switch while a helper watches the existing porch light. Once it goes dark, you’ve found the right breaker. Double-check with your non-contact voltage tester at the existing electrical box.
Step 3: Remove the Old Fixture (If Replacing)
Unscrew the existing fixture from the electrical box. Carefully pull it away from the wall — it may be attached by just two screws. Take a photo of the existing wiring before disconnecting anything. This is your reference if you need to double-check connections later. Disconnect the wire nuts and set the old fixture aside.
Step 4: Attach the Mounting Bracket
The PLUSLED sconce comes with a mounting bracket that attaches directly to a standard outdoor electrical box. Align the bracket with the screw holes on the electrical box and secure it firmly. Most outdoor electrical boxes are pre-installed at standard heights — if yours isn’t, you may need to install a new weatherproof outdoor box first.
Step 5: Connect the Wiring
This is the most important step. With the power confirmed off, match the wires from your wall to the wires on the sconce:
- Black to black — hot wire (line power)
- White to white — neutral wire
- Green or bare copper to green or bare copper — ground wire
Twist each matching pair together clockwise and secure with a wire nut. Wrap each nut with electrical tape for a weatherproof seal. Gently tug on each connection to confirm it’s secure before moving on.
Step 6: Mount the Sconce to the Wall
Carefully fold the wires back into the electrical box, then align the back of the PLUSLED sconce body with the mounting bracket. Thread the fixture screws through the base plate and tighten until the sconce sits flush against the wall. Do not overtighten — you just need a snug, stable fit. For added weather protection, run a thin bead of silicone caulk around the top and sides of the base plate where it meets the wall (skip the bottom to allow any moisture to drain).
Step 7: Install the Bulb and Restore Power
Insert your preferred E26 LED bulb into the socket. We recommend a 60W-equivalent LED (around 800 lumens) in 3000K warm white for a welcoming porch glow. Once the bulb is in, restore power at the breaker and test the light switch. Your PLUSLED outdoor wall sconce should illuminate immediately, casting that beautiful dual-direction beam you’ve been picturing.
Step 8: Final Check and Cleanup
Step back and verify the sconce is level. Check that the up-and-down beams are projecting cleanly onto the wall above and the surface below. If you applied caulk, let it cure for at least an hour before exposing it to rain. Dispose of packaging responsibly, and enjoy your upgraded porch!
Pro Tips for the Best Results
- Install two for symmetry: A matched pair of PLUSLED up-down wall sconces flanking your front door makes the biggest visual impact and is the most common professional installation.
- Add a smart switch or timer: Pair your sconce with a smart plug or in-wall timer so the lights come on automatically at dusk — no manual switching required.
- Use dimmable LEDs for ambiance: If your wall switch is dimmable, choose a dimmable E26 LED bulb to adjust the mood from bright and welcoming to soft and romantic.
- Clean the lens twice a year: Wipe the aluminum housing and any glass elements with a damp cloth each spring and fall to keep the fixture looking new and the light output at full brightness.
Make Your Home Mother’s Day Ready
Spring is the season when American homeowners step up their curb appeal game — and nothing says “welcoming home” like a beautifully lit front entrance. Installing modern PLUSLED outdoor wall sconces is a one-afternoon project with a nightly payoff that lasts for years. Whether you’re sprucing up the front porch before Mother’s Day gatherings or finally tackling that overdue exterior update, this matte black up-down wall sconce is one of the easiest, most affordable upgrades you can make.
At just $30.99 per fixture, the PLUSLED Outdoor Porch Light Up and Down Wall Sconce delivers designer style, IP65 weatherproofing, and durable aluminum construction at a fraction of the cost you’d pay at a big-box home improvement store.
Ready to upgrade your porch this spring? Shop the PLUSLED Matte Black Up-Down Wall Sconce today and transform your home’s exterior in a single afternoon.
Shop This Product
Like what you see? Click below to view full product details and order from our store.
View Product Details →